Cloud Foundry SSH
Overview SSH
Introduction
Secure Shell (SSH) is a network protocol for operating services over an unsecured network. Cloud Foundry offers such a functionality for connecting to applications running on Cloud Foundry and for managing bound Backing Service instances. Read the official CF SSH Components and Processes article if you want to have more information about the underlying implementation.
For instance if you need to troubleshoot and instance of an app, you can connect via SSH directly to the container executing your application. This enables you to troubleshoot problems by viewing additional log files or monitor load of individual processes with the standard system tools.
Besides troubleshooting applications you can also use SSH to connect to a Backing Service instance and execute raw SQL commands, to import and export data or to debug application data issues (see Accessing Services with SSH and the Backing Service documentation for more details).
SSH Access
We recommend to only enable the SSH access when required and to deactivate it afterwards. In addition, consider who receives the permissions to enable and disable the SSH access and limit this only to person who should have it.
Control Hierarchy
Default Settings
- Space SSH is activated by default.
- App SSH is deactivated by default until a user with the role Space Developer enables it for a specific app.
The following table shows the CF user roles and their scopes of permissions for enabling and disabling SSH.
| CF User Role | Scope of SSH Permissions | Available Commands |
|---|---|---|
SpaceManager | Space | cf CLI allow-space-ssh and disallow-space-ssh commands |
SpaceDeveloper | Application | cf CLI enable-ssh and disable-ssh commands |
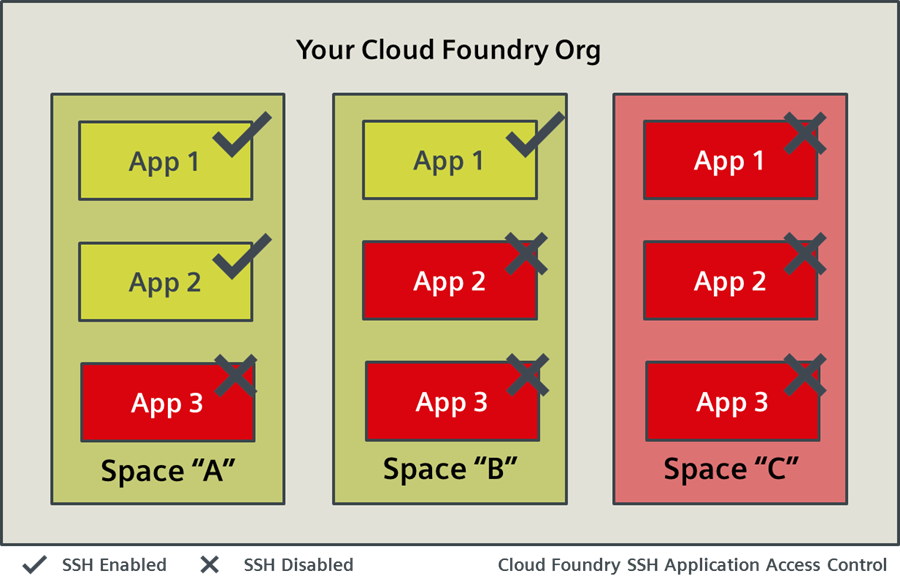
Access to an application via SSH is only possible if space managers and space developers grant SSH access at their respective levels. To illustrate this the following image shows a Cloud Foundry Org where:
- A space manager enabled SSH access for all applications running in spaces
"A","B"but not"C". - A space developer allowed SSH for application
"App 1"and"App 2"but not for"App 3"in space"A" - A space developer allowed SSH for application
"App 1"but not for"App 2""App 3"in space"B"
Connect to an application via SSH
Next, we show you in a step-by-step guide how to connect to your application via SSH with the CF CLI.
Prerequisites
You need to have
- either a user with the CF roles
SpaceManagerandSpaceDeveloper, - or access to a space with already enabled SSH access and the role
SpaceDeveloperand - a running application in this space.
Steps
Follow the steps to connect to an application container:
- Log into Cloud Foundry by using the CLI (e.g.
cf login -a https://api.cf.eu1.mindsphere.io --sso). - Select the space with enabled SSH or enable it with
cf allow-space-ssh {spaceName}. - Check with
cf space-ssh-allowed {spaceName}if SSH is enabled. - Run
cf enable-ssh {appName}to enable SSH for your application. - Restart your application.
- Use
cf ssh {appName}to connect to your application.
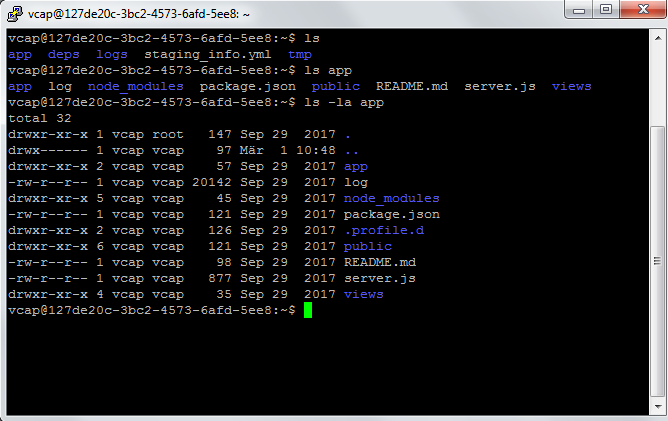
You are now connected to application container. Test the connection by running commands like ls or top inside the container.
Exit and disable the access afterwards::
- Run the command
exitto close the connection. - Use
cf disable-ssh {appName}to disable the SSH application access. - Restart your application.
- You may run
cf disallow-space-ssh {spaceName}to deactivate the SSH access for the space.
Info
You must restart your app after enabling SSH access.
Connect with a proxy configuration
In case of being behind a company proxy or if you want to use special SSH tools like scp you need to connect differently. This step-by-step guide shows you how to connect to an application with Putty.
Prerequisites
You need to have
- either a user with the CF roles
SpaceManagerandSpaceDeveloper, - or access to a space with already enabled SSH access and the role
SpaceDeveloper, - a running application in this space and
- Putty installed on your system or another SSH tool.
Steps
Follow the steps below to securely connect to an application instance by logging in with a specially-formed username that passes information to the SSH proxy running on the host virtual machine of the container:
- Log into Cloud Foundry by using the CLI (e.g.
cf login -a https://api.cf.eu1.mindsphere.io --sso). - Select the space with enabled SSH or enable it with
cf allow-space-ssh {spaceName}. - Check with
cf space-ssh-allowed {spaceName}if SSH is enabled. - Run
cf enable-ssh {appName}to enable SSH for your application. - Use
cf app {appName} --guidto get the application identifier. - Retrieve with
cf curl /v2/infothe SSH endpoint (e.g."app_ssh_endpoint": "ssh.cf.eu1.mindsphere.io:8443") as the endpoint and port might change. - Run
cf ssh-codeto obtain a one-time-password - Use all information above to build a SSH connection URL with the following scheme
cf:APP-GUID/APP-INSTANCE-INDEX@SSH-ENDPOINT(e.g.cf:2762072f-1e4e-4b73-8c9c-89c8e14382e5/0@ssh.cf.eu1.mindsphere.io) - Start Putty
- Input the previously created SSH connection URL and port in the
Host Name (or IP address)andPortfields. - Optional: Configure a proxy in
Connection / Proxyoptions. - Click on
Open - Use the one-time-password when being asked for a password
You are now connected to your application container. Use a command line tool like ls or top to test your connection.
Exit and disable the access afterwards::
- Close the window to close the connection.
- Use
cf disable-ssh {appName}to disable the SSH application access. - You may run
cf disallow-space-ssh {spaceName}to deactivate the SSH access for the space.
Results
Accessing Backing Service Instances
For accessing a Backing Service instance we recommend to read the official Accessing Services with SSH documentation. In addition, you can find tutorials in the Backing Service documentation about connecting to the instances (use the left-hand-side navigation). For example see how to make a PostgreSQL service instance locally available.
Related Links
- CF SSH Components and Processes
- Accessing Services with SSH
- Accessing Apps with SSH
- Application SSH Access without CF CLI
Except where otherwise noted, content on this site is licensed under the Development License Agreement.