Simple Anomaly node library
Introduction to simple anomaly nodes
The anomaly nodes help to detect anomalies in a data set.
The simple anomaly nodes in Visual Flow Creator are of two types:
- Training model
- Reasoning model
!!! note "Region deviation Support for "Simple Anomaly nodes" is in progress for Region Europe 2.
Terms and definitions
Cluster: A cluster is a high density region in a defined space. Each cluster is a set of data points which defines a dense region.
Anomaly points: The number of anomaly points available outside a data cluster.
Neighborhood: The neighborhood of a point is a set of all points that are within a distance set by the neighborhood parameter.
Epsilon (ε or eps): The epsilon (ε) defines the distance defined of neighborhood around a certain point in the selected algorithm (Euclidean, Manhattan, Chebychev).
Anomaly extent: Distance between an anomaly point and its centre point (ε) of the cluster. Anomalies are minimal for lesser anomaly extents. For greater distances, anomalies are larger.
Algorithms: Euclidean: The Euclidean distance is defined by a straight line between two points. Manhattan: The Manhattan distance measure algorithm finds its application on high dimensional vectors. The sum of the absolute differences among their coordinates is defined as the distance between two points. Chebychev: The maximum distance from the centre of a cell to its adjacent cells centre is defined as the Chebychev distance between two points.
Training model node
The training model node defines a new model of some data sets in Visual Flow Creator.
The data set information gets configured as read time series node with one condition - you can select only one aspect. The data set is defined by asset/ aspect/ variable. The data set can be selected using "Select asset aspect" selection dialog box.
Training model created will be stored in Industrial IoT exchange storage.
Training model node properties
You can confirgure the node by editing its node properties.

| Field Name | Description | Mandatory |
|---|---|---|
| Name | Select a display name for the node. | No |
| Model Name | Name the new training model. | Yes |
| Description | Enter the description. | No |
| Topic | Import the required time series data from the "Topic" field. The menu will redirect to select read time series data with asset /aspect variable. | Yes |
| Topic Summary | Each asset will have aspects which are defined by variables. Select the required variable of the selected aspect of its asset to import the data in the "Training model" node properties. This will autofill the "Topic Summary" field. | Yes |
| Mode | Select the mode from the drop-down menu. "Mode" is either defined by period of time or an interval. | Yes |
| Period | ||
| Period | Select the time period from the drop-down menu. The time period drop-down has values defined in minutes, hours, days and weeks. | Yes |
| Offset | Select the offset value for balancing the effects. The offset values are defined in seconds. | Yes |
| Interval | ||
| Timezone | Select the required time zone from the drop-down menu. | Yes |
| From | Select the start date and time from the calendar and time menu. | Yes |
| To | Select the end date and time from the calendar and time menu. | Yes |
| Epsilon | Set the ε for the new model. | Yes |
| Min. points per cluster | Define the minimum number of points which are in each cluster. | Yes |
| Distance Measure Algorithm | Select the required distance measure algorithm from the drop-down. Three algorithms are available: - Euclidean - Manhattan - Chebychev | Yes |
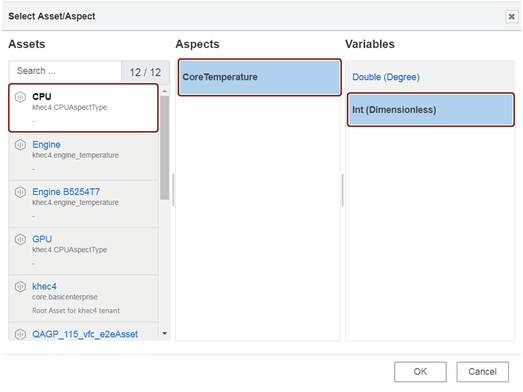
When you set the topic in "Select Asset/ Aspect" dialog box, select the necessary asset, aspect and its variable as shown below:
Jobs run involved
While injecting a timestamp to the "training model" node, a set of batch jobs run in the following series:
- Fetching IoT data
- Create model job
- Export job and generating output
Reasoning model node
The reasoning model node is used for analyzing data for a stored training model.

Reasoning model node properties
You can confirgure the node by editing its node properties.
| Field Name | Description | Mandatory |
|---|---|---|
| Name | Select a display name for the node. | No |
| Model Name | Select a training model from the menu. | Yes |
| Description | Enter the description. | No |
| Topic | Import the required time series data from the "Topic" field. The menu will redirect to select read time series data with asset /aspect /variable. The import will capture the actual details of the model selected. However, the aspects and variables imported should be same as that selected for the "Model Name". | Yes |
| Topic Summary | Each asset will have aspects which are defined by variables. Select the required variable of the selected aspect of its asset to import the data in the "Training model" node properties. This will autofill the "Topic Summary" field. | Yes |
| Mode | Select the mode from the drop-down menu. "Mode" is either defined by period of time or an interval. | Yes |
| Period | ||
| Period | Select the time period from the drop-down menu. The time period drop-down has values defined in minutes, hours, days and weeks. | Yes |
| Offset | Select the offset value for balancing the effects. The offset values are defined in seconds. | Yes |
| Interval | ||
| Timezone | Select the required time zone from the drop-down menu. | Yes |
| From | Select the start date and time from the calendar and time menu. | Yes |
| To | Select the end date and time from the calendar and time menu. | Yes |
When you select a model name, the data of the selected model will be imported to the reasoning model node for analysis.
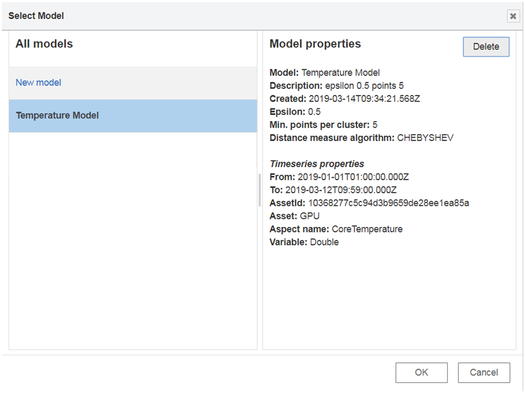
The property details of the selected model will also be displayed to the user.
Jobs run involved
While injecting a timestamp to the "reasoning model" node, a set of batch jobs run in the following series:
- IoT import job creation
- Import the job model
- Apply the job model
- Export the job and save in the database
Using simple anomaly nodes
Example scenario
Configure a training model node. Analyze the anomalies in the model.
Objective
To analyze the anomalies in the newly created training model with the help of a reasonaing model node.
Requirements
Import the data from Fleet Manager to create a training model.
Configuration of the traning model is given below:
| Field Name | Data |
|---|---|
| Name | CPU temp measure |
| Model Name | Temperature Model |
| Description | epsilon 0.5 points 5 |
| Topic | 10368277c5c94d3b9659de28ee1ea85a |
| Topic Summary | Asset: 10368277c5c94d3b9659de28ee1ea85a (GPU) Aspect: CoreTemperature Variable: Double |
| Mode | Interval |
| Period | |
| Timezone | UTC |
| From | 2019/01/01 01:00:00 |
| To | 2019/03/12 09:59:00 |
| Epsilon | 0.5 |
| Min. points per cluster | 5 |
| Distance Measure Algorithm | Chebychev |
Procedure
- Select a reasoning model node from the "simple anomaly" nodes section.
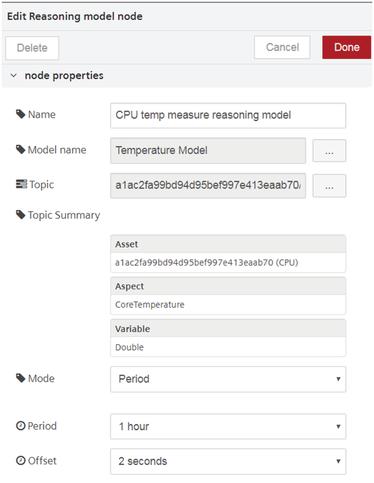
- Configure the reasoning model node. The configuration of the node is given below:
| Field Name | Data |
|---|---|
| Name | CPU temp measure reasoning model |
| Model Name | Temperature Model |
| Topic | a1ac2fa99bd94d95bef997e413eaab70 |
| Topic Summary | Asset: a1ac2fa99bd94d95bef997e413eaab70 (CPU) Aspect: CoreTemperature Variable: Double |
| Mode | Period |
| Period | |
| Period | 1 hour |
| Offset | 2 seconds |
3.Insert an input timestamp and a mesage payload to the reasoning model node to generate the output in the message payload.

Note
The "Topic Summary" properties in training model node should match the "Topic Summary" properties of the reasoning model node. This means that aspects and the variables for both should be same else the output will conflict and result in a failure.
Result
Inject the timestamp to process the flow.
You get the following result in the message payload:
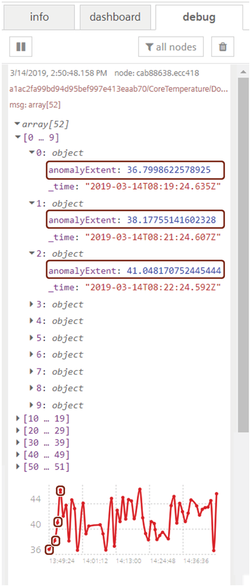
Some of the initial anomaly points are highlighted in the graph as well in the array description.
Except where otherwise noted, content on this site is licensed under the Development License Agreement.