Model Management and Execution
This section describes what models are in Predictive Learning and the steps required to develop a model.
Also included in this section are descriptions and step-by-step instructions for:
- Developing a New Model
- Importing a Model
- Actions You can Take with Models
- Executing a Model
- Advanced Docker Model Settings
- Executing Models on a Schedule
About Models and Model Types
Model is a analytical script written in form of Jupyter notebook, Zeppelin Notebook or bundled into a docker image.
Model Types
The types of models you can create in PrL are:
- Jupyter Notebook
- Docker Image
Viewing Models
Click a Browse Models link on the Models landing page. The Models list page displays a table that lists information about the models you have access to. Each model's details are shown, as well as icons that allow you to perform various actions with models.
Note
Maximum file size for the model uploads are limited to 50 MB.
Actions You can take with Models
Action icons appear on the right side of the Models table. Some icons display only when you click the series of ellipses. Here are the actions you can take with models:
Opening a model—click the launch icon to open a model.
Ellipses—click the ellipses to view actions you can take, that include:
- Deleting a model—displays an "Are you sure?" dialog to prevent unintended deletions.
- Editing a model—displays a dialog in which you can change the name and description in a pop-up dialog, but you cannot change the model type.
- Creating a version—select whether to create a minor or major version (major = 2.0; minor=1.1), set an expiration date and model type, and browse for a model to upload, up to 50MB.
- Downloading a model—opens File Manager for saving the model to the location you specify.
Importing a Model
When importing an existing model, the process begins with the "Import a Model/Develop a New Model" pop-up Window:
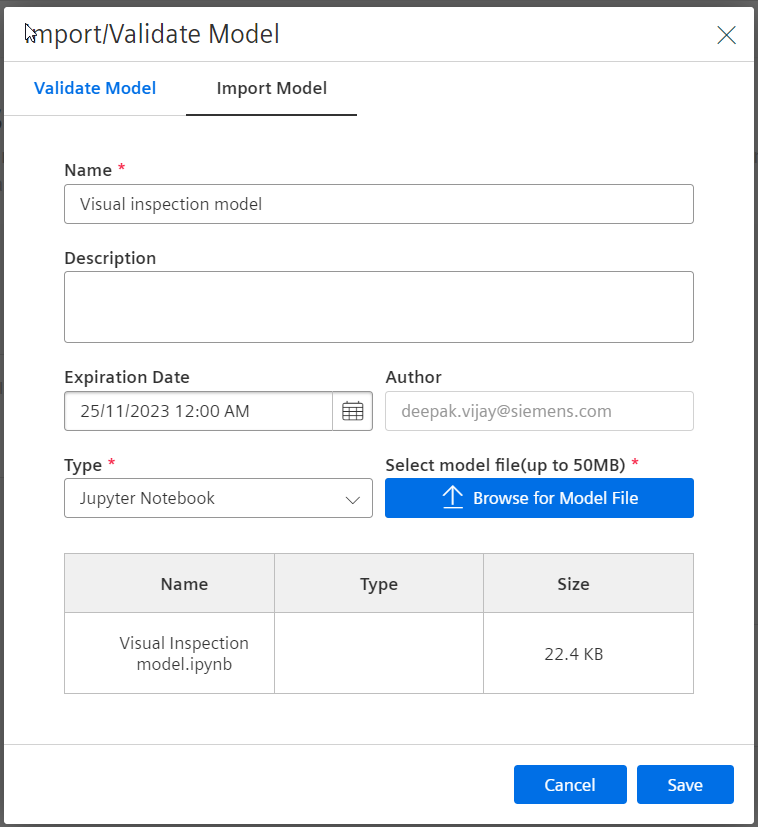
Follow these steps to import a model:
- Click "Import/Validate Model" on the Landing or Models list page. The Import/Develop a Model pop-up window displays.
- Make sure you are on the "Import a Model" tab.
- Enter a name and description (optional).
- Select an expiration date from the Calendar pop-up window.
- Select a model type from the Type drop-down list, or select "Browse" to locate and select a model file.
- Click "Save". Your imported model displays in the Models table.
Importing Docker Images
If you select the model Type to "Docker Image" the "Browse for Model File" button will be replaced with the "Generate Token" button. This is required due to way Docker images can be imported in the application. In general, Docker images are developed locally or, it can be imported from an external source.
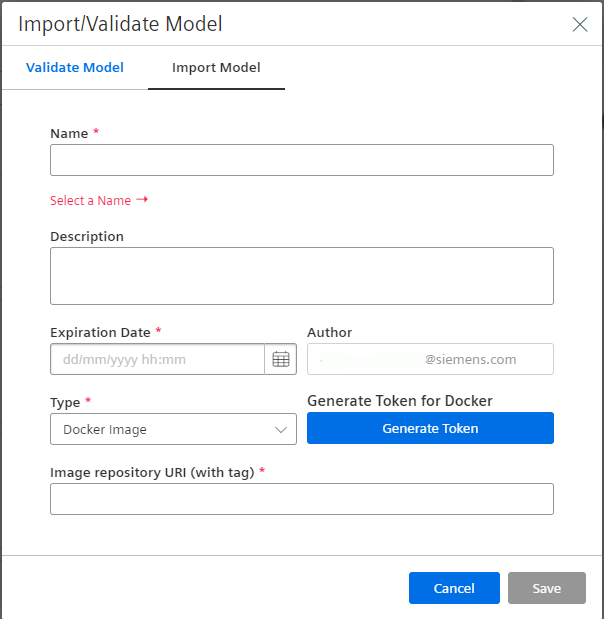
Clicking the "Generate Token" will provide you with a temporary session credentials that will allow you to upload the Docker image to our Docker registry. We require this in order to allow secure and high-performance on any usages of your Docker image. After you upload your Docker image, we will hold a secure and private copy of it that can be accessed only by your tenant. In addition, we wrap the image with metadata needed to execute it and map any inputs and outputs to it, as well as to show logs that come out of its execution. Now let's proceed and click "Generate Token":
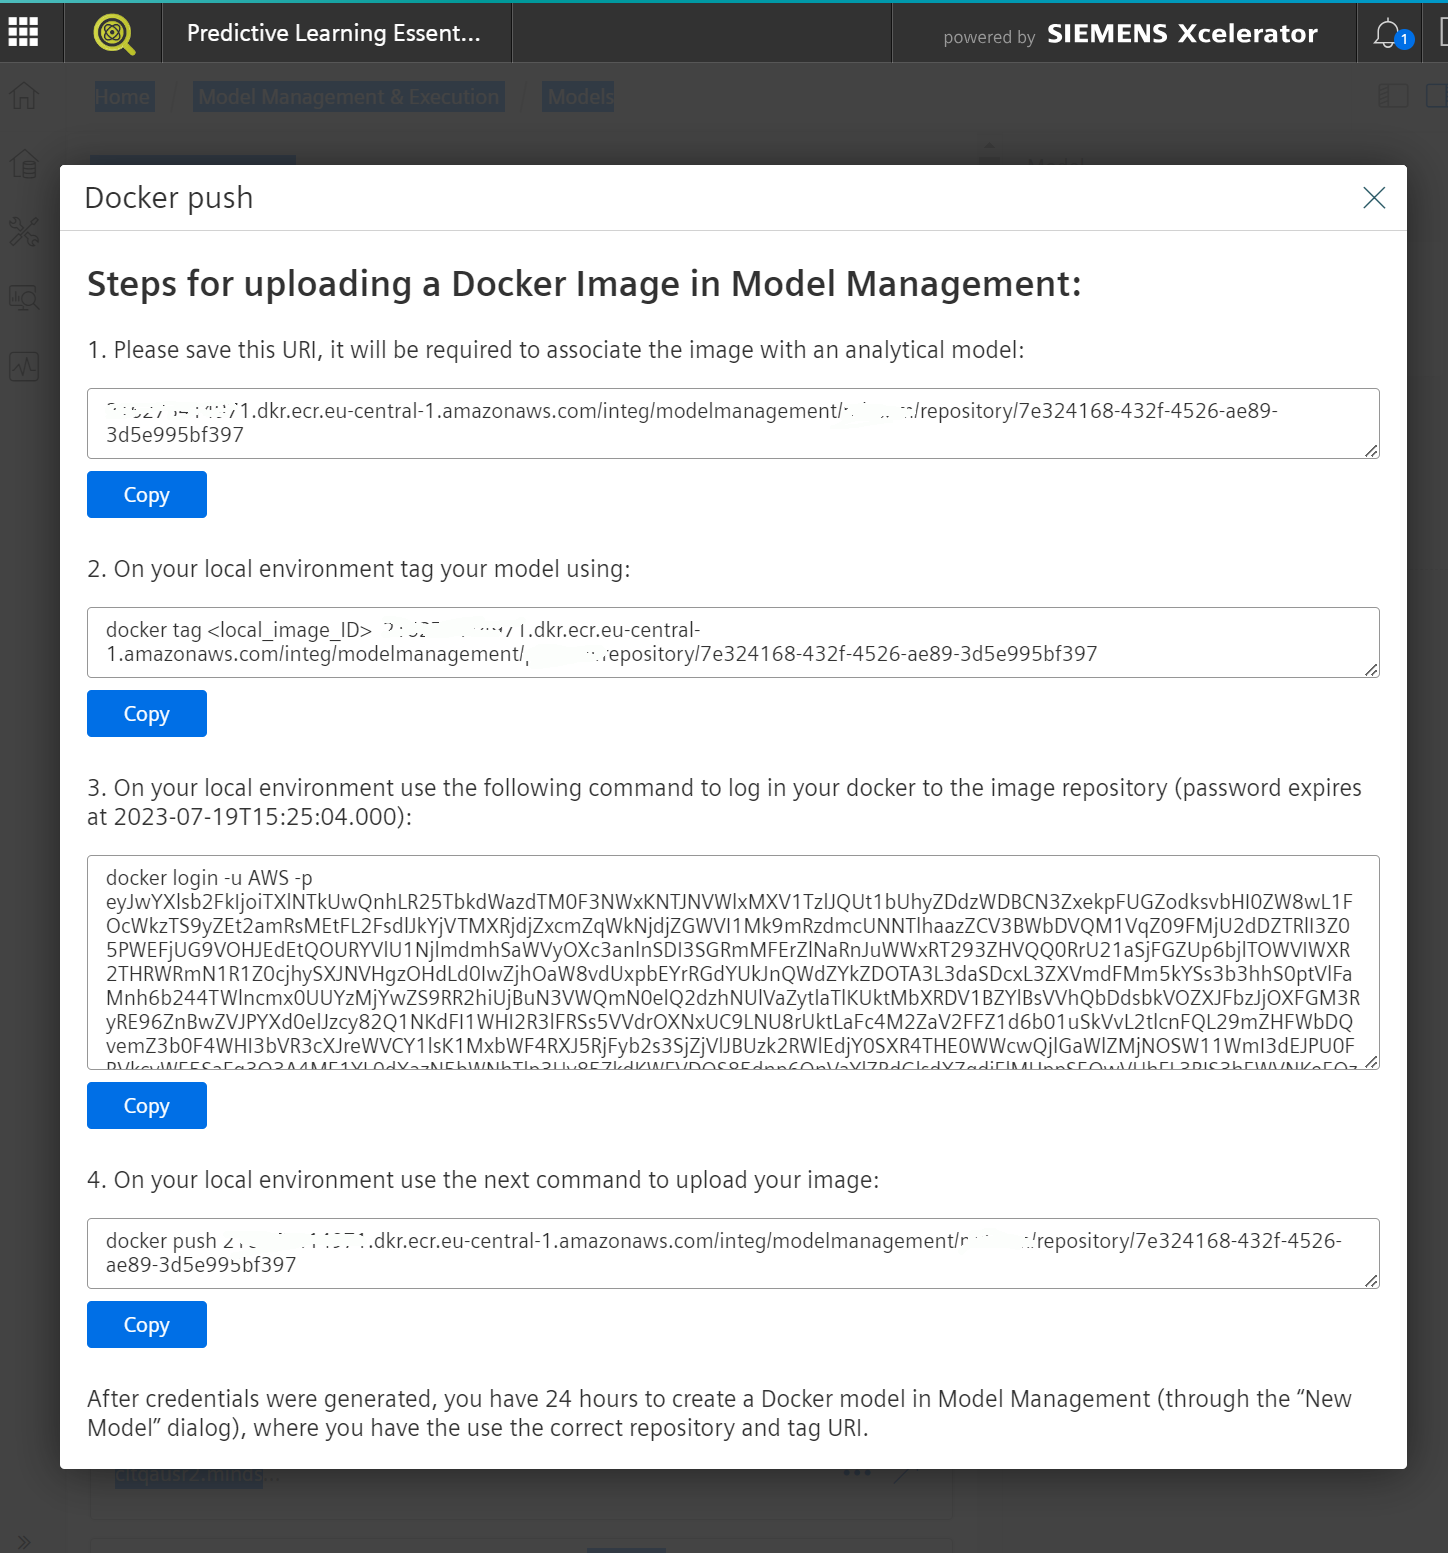
Already built Docker images tend to be large files as they are they contain complete setups of operating systems with your own additions. This allows replicating environments that you have built and prepared, as well as their execution in most of the other external environments, such as public or private cloud environments. Docker images pack everything into an hierarchical structure (layers) and contain the metadata needed to interact with the exterior and with its own container engine. These images are built with a Docker compliant engine following a set of instructions that are described in a file named Dockerfile. A Docker engine compiles these instructions into a Docker image that can be distributed and instantiated as a Docker container by any container compliant engine. Building the image is often done with the help of a command line interface, and we are requiring the same Docker compliant command line to upload the image into our system. Therefore, the instructions in the pop-up are meant to be used with such a command line, but they target the Docker CLI.
- This is meant for reference only, our system designates an URI that will tell you where your Docker image will be uploaded. This is immutable and attempting to change it, will make our system unaware of where you have uploaded your Docker image
- Tag your local image with the instructions from this step. You need to replace
with your local IMAGE_ID, that you find by using "docker images" command; the can be found under the "IMAGE_ID" column - login to our Docker registry using the command provided at this step. You can expand the textbox containing the long session string to reveal the registry where your Docker image will be uploaded

- after you get a successful login at the above step, you can start "pushing" (uploading) your local Docker image to our registry using the command from this step.
Now you can close the pop-up.
Please note that your local image might have a "tag" that is usually the string that follows after the URL and is separated by a colon, like in "URL:tag". The tag is helpful to denote versions for example, like "v1.0.1" or "final-v1.0". If your tagged image at step 2 above includes this tag, then, after closing the pop-up, you need to paste the URL stated at step 1 above, in the pop-up, in the "Image Repository URI (with tag)" field, including the tag, as in the picture below.
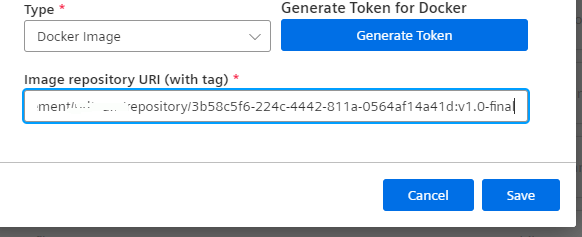
Make sure that you click "Save" only after pushing your Docker image has been finished.
Clicking "Save" will instruct the system to verify the Docker's image existence in our registry and its validity.
Downloading a Docker Image
You can download a previously uploaded Docker image by using similar steps as the ones above. Instead of pushing you will be able to download (pull) a Docker image once you have a valid temporary session with our Docker registry. From the Models list, click the "..." button and use the "Download model" action menu. This will not download the actual image but the access session in the form of a JSON file. From the JSON file you can depict the keys needed to login to our registry.

Using Docker CLI, you can proceed using a similar "docker login -u AWS -p
Provided JSON file contains two types of authentication: 1. first part for Docker compliant CLIs under the "credentials" key, that contains "user", "password"; these can be used with Docker CLI to connect to our registry 2. second part, "providerCredentials" containing "accessKey", "secret" and "sessionToken" for AWS CLI For the second option you can use the AWS CLI tools to interact with your image. It provides additional -but limited to AWS ECR- functionality than Docker CLI (e.g. docker image scanning); the list of capabilities can be explored directly from the AWS CLI once you logged in the registry.
Validating a New Model
When validating a model, the process begins with the "Import/Validate Model" pop-up Window:
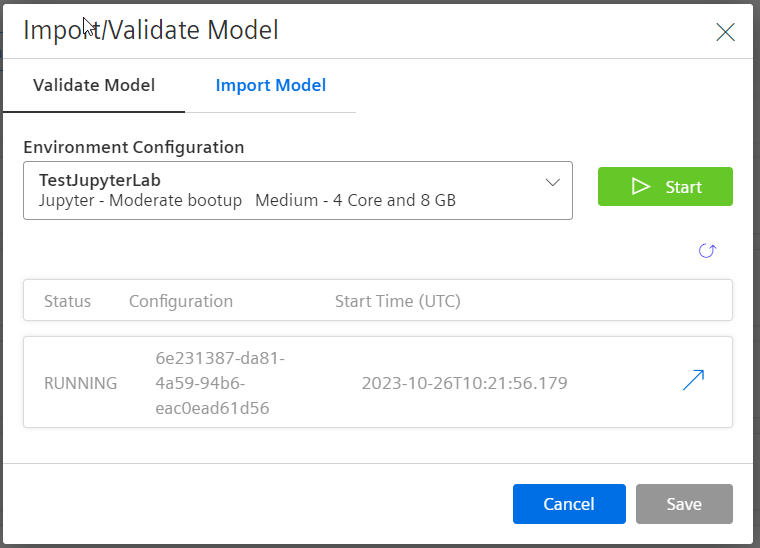
Follow these steps to develop a new model:
- Click "Add/Develop Model" on the Landing or Models page. The Import/Develop a Model pop-up window displays.
- Make sure you are on the "Develop a New Model" tab.
- Select an environment from the drop-down list and click "Start".
- When the environment configuration displays a "Running' status, click the arrow icon. Your environment configuration opens in Jupyter Notebook.
Executing a Model
Executing a model involves running an analytical model against source data in a specific environment. Sometimes this is called "running a job" in Predictive Learning.
To run a basic PrL job you need to configure:
- Input—source (location) from which PrL reads the data for the job
- Output—location to which PrL writes the job results data
- Model—the mathematical model that runs against the input data
- Environment—start and stop environments for running jobs
How to Execute a PrL Model
Follow these steps to execute your model:
- Click "Add Job" in Quick Actions.
- Enter a name and an optional description.
- Select a model from the drop-down list.
- Select an Environment Configuration from the drop-down list.
- Select a data source for Input and Output.
- If you want to schedule the job to run, see "How to Add a Schedule to a Job" below, before you click the "Add Job" button.
- Click "Add Job".
Note
Incase of LPC, each model will run in its own pod, and there is no maximum limit based on resource availability within the kubernetes cluster nodes.
It is a known limitation if a pod can't start due to node unavailability, it remains in a "Pending" state, impacting operational efficiency and slowing down application performance.
Executing Models on a Schedule
PrL jobs can be run ad-hoc or you can schedule them to run for a specific amount of time. If you want to run your job on a schedule, you have to set it up while you are creating the job.
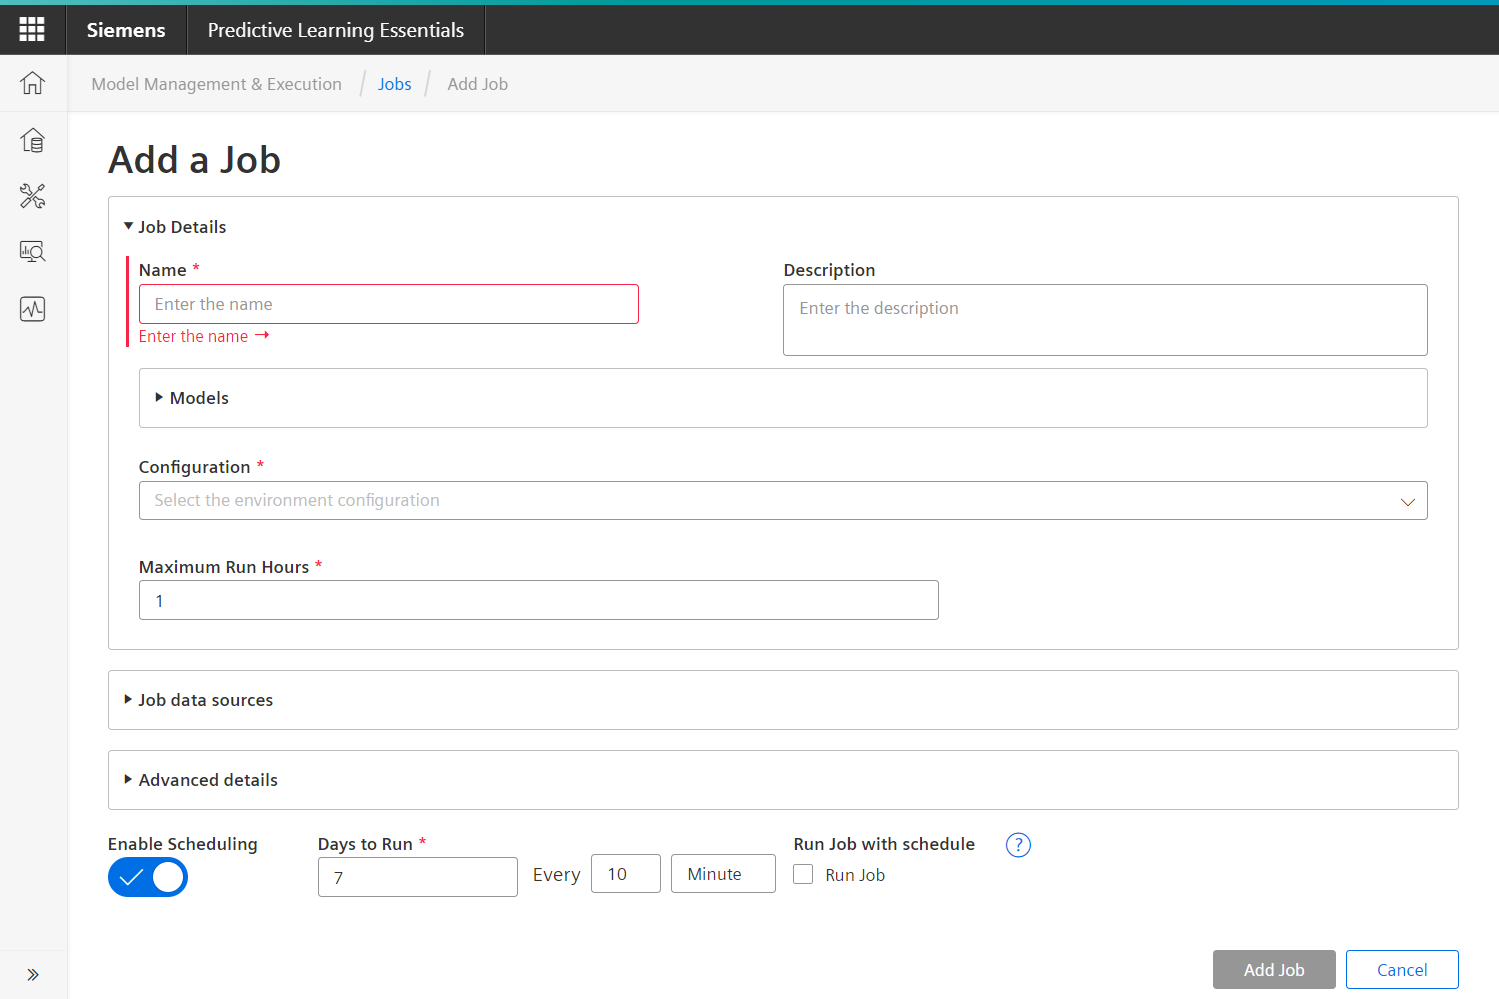
How to Add a Schedule to a Model Job
The "Enable Scheduling" toggle is located at the bottom of the "Add a Job" page.
Follow these steps to add a schedule to a job that you create:
- Slide the Enable Scheduling toggle to the right.
- Enter a number in the Days to run field.
- Select a time increment from the drop-down list.
- Click "Add Schedule".
Note
Quick boot-up environments allow for a minimum scheduling interval of 5 minutes, whereas moderate boot-up environments permit a minimum scheduling interval of one hour.
Advanced Docker Model Settings
When using Docker models, you can also customize the model using these additional settings:
- External reference IDs
- Start Command
- Maximum Run Hours
- Environment Variables (key/value pairs)
- Entry Point
- Scheduling
How to Add Advanced Settings to a Docker Job
With the exception of the Maximum Run Hours field, all of the advanced option fields are optional. Follow these steps to add advanced options to a job:
- Click "Advanced Details".
- Enter an optional external reference ID.
- Click the icon in the Environment Variables field to add Key / Value pairs in the pop-up window.
- Click "OK".
- Enter a Start Command and Entry point.
- Enter a number in the Maximum Run Hours field.
- Click "Add Job".
Except where otherwise noted, content on this site is licensed under the Development License Agreement.