Manual Inputs
With Manual Inputs, Insights Hub OEE allows users to add OEE relevant data manually to the system. This includes the following data:
- Order Information
- Product Information
- Total Parts Counter
- Good Parts Counter
- Rejected Parts Counter
- Reject Reasons
- Machine State Distribution
To view and edit Manual Inputs, you need to assign yourself the "Operator" role in the Insights Hub settings. In addition, you also need to set required variables as "Manual" instead of "Connected" to be able to put it in data manually.
Once you met the prerequisites you can navigate to the Manual Inputs via the navigation bar on the left. Please click the manual inputs icon ![]()
Manual Inputs User Interface
General Behavior
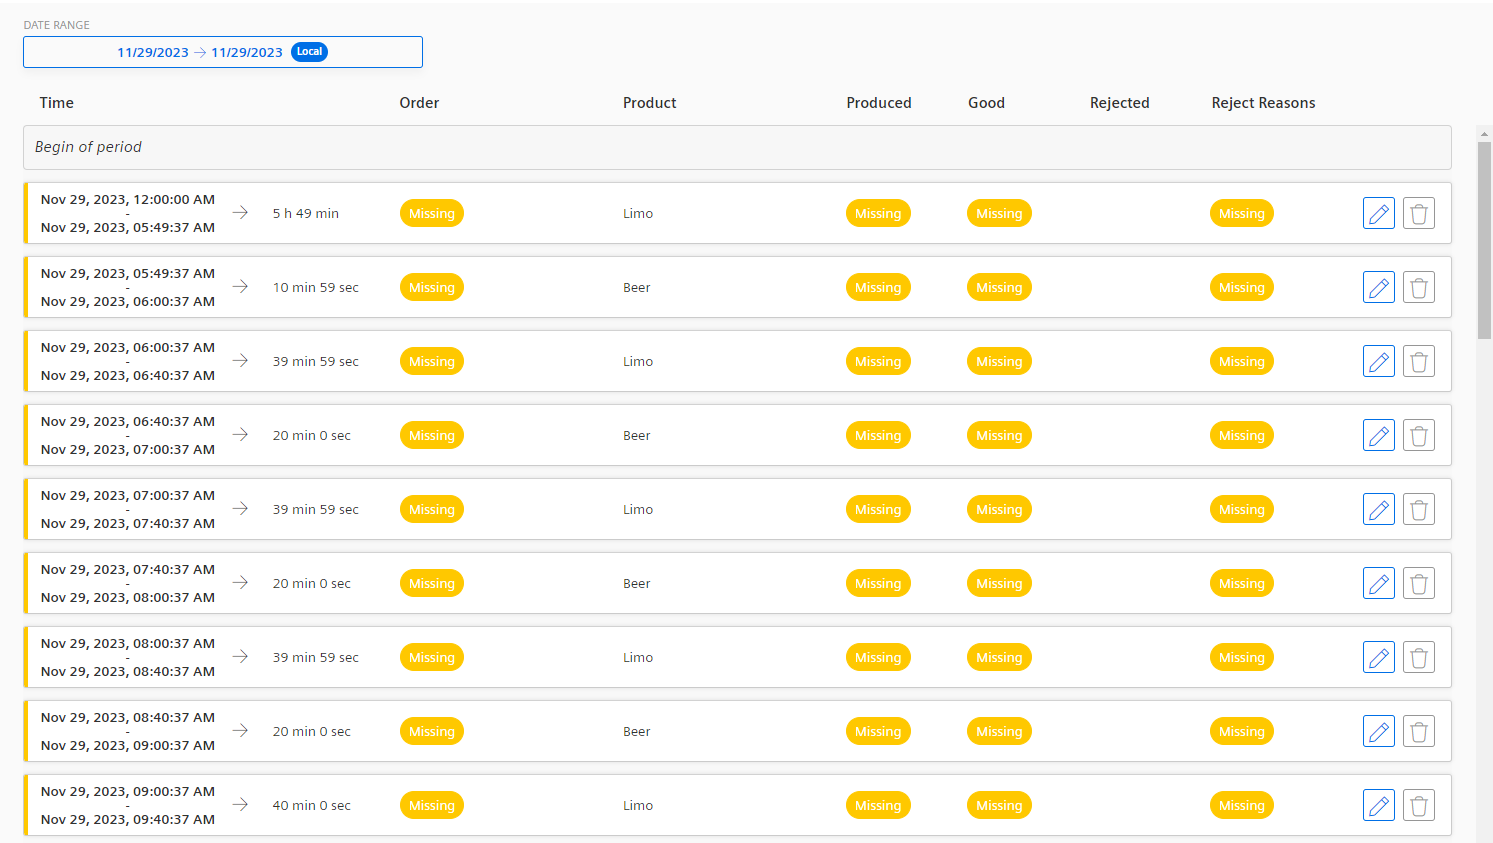
In general, all generated / pre-populated production periods on the manual inputs screen depend on your asset configuration. For example, if you connected all variables except the order information, then you will see multiple production periods populated on the screen which will show you the different products that were produced with the associated counters. The different production periods will indicate then what information is still missing through the yellow "Missing" label  .
.
Incomplete production periods will also be marked with a yellow flag on the left side.

Distribution of production counters within one calculated bin
A bin is defined as a time interval of minimum one hour, for which the KPIs are calculated for. Up to 100 bins will be calculated by the application. So, depending on your selected time range the bins will either be 1h or longer. So, when a manually provided production period needs to be divided in more than one bin the following rules will be applied to the two cases:
-
Manually provided machine state: in this case the counters will be equally distributed across all bins and only planned stops from the calendar will be considered.

-
Connected machine state: In this case, the planned stops and the availability losses will be considered.

The total values are always the total values for the time range of the manually provided production period.
Partly used manual production periods
It can happen that the time range a user selected is not covering the whole manually provided production period. Mainly, it happens for the very first and last manually provided production period within the time range. In this case, the system can not use all manually provided values to calculate the KPIs. The system follows the same logic as for the bin calculation, please refer to section above.
How to edit Manual Inputs
As mentioned before, the application enables you to input missing information manually through an input screen. The different inputs will be described in the following subsections. You can start to input data through clicking on the pen icon on a production period.
Following that, you will be presented with the input screen.
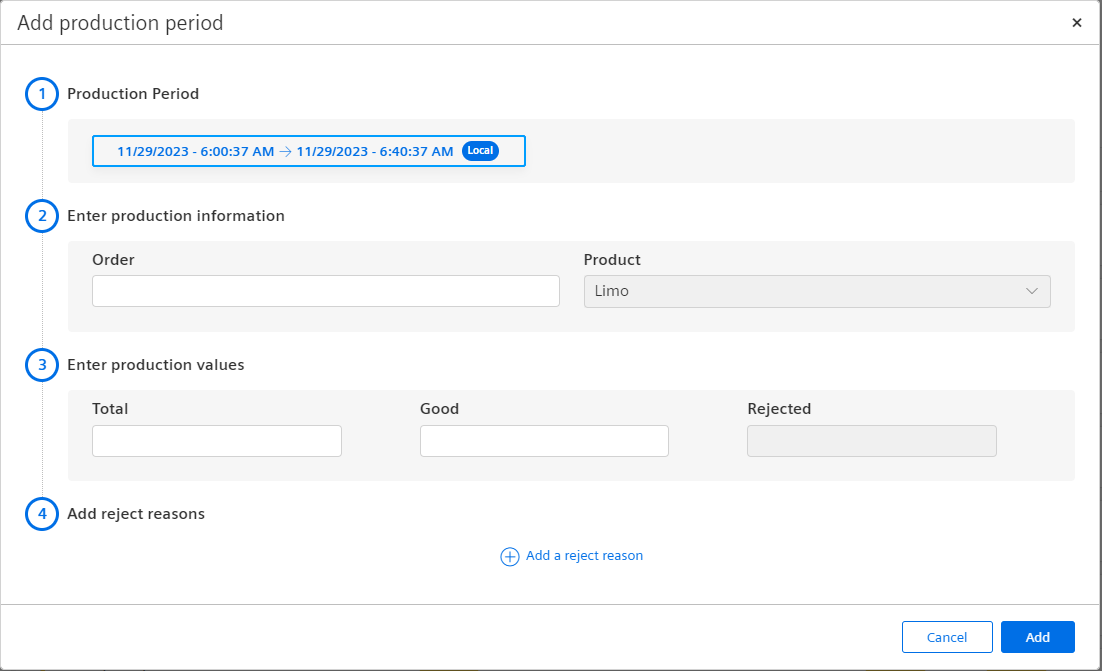
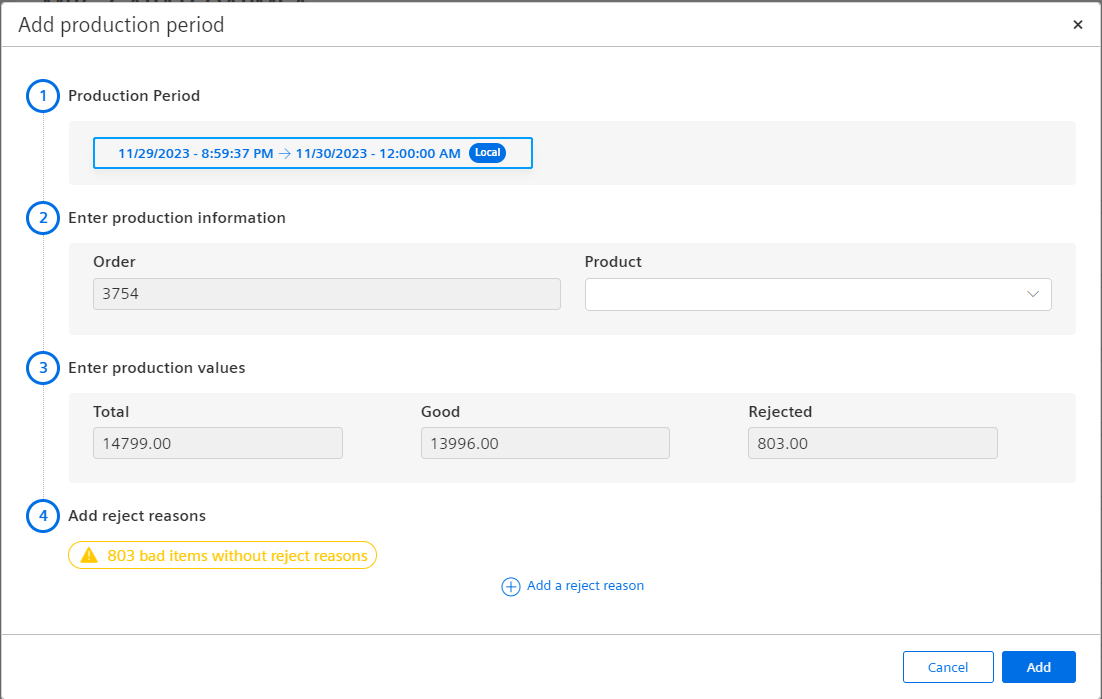
On top, the dialogue always shows the selected production period and the respective time range. Here, the application allows you also to shorten the time range. This behavior might be needed if you need to split a pre-defined time period to add an additional order or product. This will be explained by an example in one of the following sub-sections.
Depending on your configuration, fields will be disabled because the system already receives this information from a configured variable. In the screenshot above, the product can be fetched from the timeseries data whereas the order information, the total counter and good counter need to be ingested manually for the production period. In this example, the rejected parts are configured as calculated and hence the field is disabled. In addition, the user can also specify reject reasons.
Production Information - Order and Product Information
If you specified the order or product or both as a manual input, you can adjust the values in the respective field.

The order information needs to be typed in the corresponding field. Based on the configured product collection, you will be able to select the appropriate product from the dropdown.

Again, based on your configuration the respective fields will either be enabled or disabled for manual inputs.
Production Values - Good Parts, Rejected Parts, Total Parts
One of the most common topics is that a customer would like to add the counter values of a machine, because they could not be tracked directly at the asset. Depending on your configuration, the following fields will be enabled or disabled.

In the example above, total and good parts were configured as manual for the machine and the rejected parts are calculated by the application.
Reject Reasons
If you have configured a reject reason collection and also assigned it to a machine or line, then you will be able also to keep track of the reject reasons of the machine. Once you start tracking this information, the Quality page will also show that information, e.g., displaying the top ten reject reasons in a pareto distribution. So, the overall goal is to help you understand your quality issues better and to improve the overall quality.
Based on your manual or automatic inputs, the application will give an indication how many rejects are still unspecified.

In the example from above, 10 rejects were not specified yet. If you click on the "Add a reject reason" button, then you can select a reason from a dropdown and also specify the number of rejects.

You have to repeat this process, until all rejects are specified.

Once you are done with that, you can click the "Update" or "Add" button to finish the operation.
Machine State Distribution
Because some machines can't be connected to Insights Hub, there is also a possibility to manually input a status distribution. This needs to be done for every product change, since otherwise it is impossible to calculate the theoretical output per product properly.

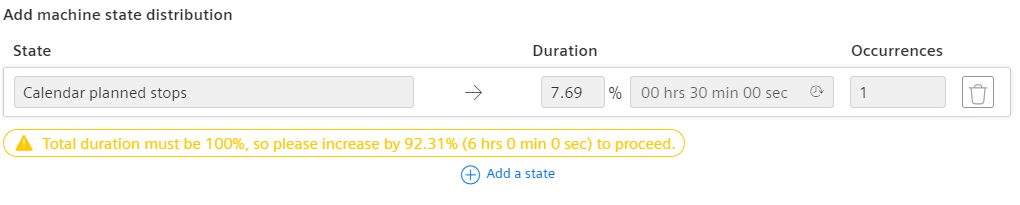
To add a status distribution click on "Add a state". If the calendar has planned stops in the selected time range, then they will automatically be shown in the list as well, however they can't be modified here.
In the first step, you select a state from the reason tree from the dropdown. Once you have set it, you can either give a percentage of time or a proper duration. The time picker features two modes. First, it allows you to enter the time in numbers, like hours, minutes and seconds. Secondly, you can also use a more visual time picker, if you are working with a touch screen. Therefore, you have to click on the clock icon in the duration picker and the following screen will appear.
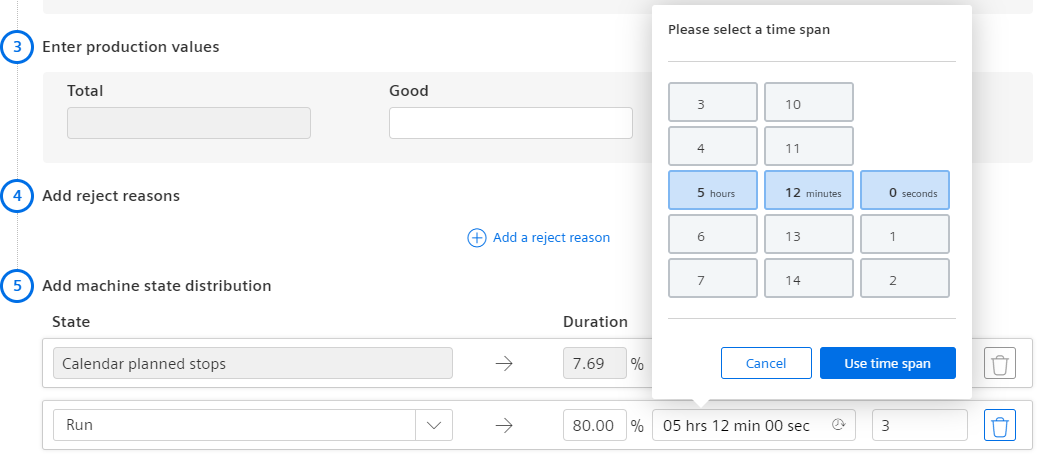
You can either scroll through the different times with the mouse wheel or by using your finger on a touchscreen device.
As a second step, you also have to input how often this type of state occurred. Later, the occurrence information will also be used in the downtime reason analysis and the status distribution on the Availability page.
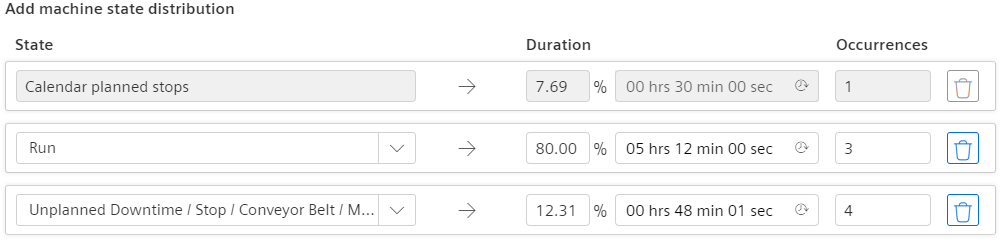
Once you filled in all the states and reached a total of 100% in the distribution you can save the information for the production period.
Split Periods to add products or orders
Whenever you receive the product or order information automatically from the system, it could be required that you need to split an existing time period to account for more products or orders. For example, you are receiving the order information "ABC" for a specific production period, e.g., from 9 pm to 12 am. During that time frame, you produced the two products beer and lemonade.
| Date range | Order | Product |
|---|---|---|
| 09:00 pm - 10:30 pm | ABC | Beer |
| 10:30 pm - 12:00 am | ABC | Lemonade |
To achieve a split of a production period, you need to perform the following steps. First, open the production period that you would like to split into multiple periods.
Second, adjust the time frame to the first production period. In the example above, the time range will be adjusted from 9 pm to 10:30 pm.
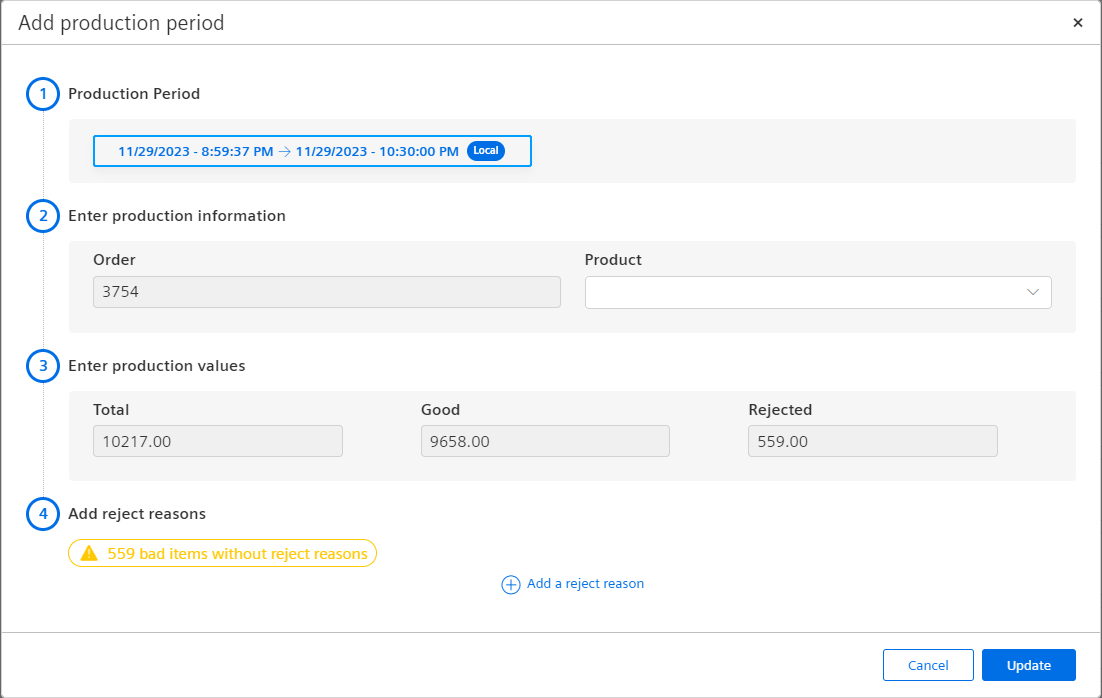
Once you adjusted the time range, the collected counters will also be adapted. You can now set the proper product for that period and update the time period.
In addtion, the application will automatically indicate that there is still a gap in the data and that a production period needs to be created for the remaining time.

Once you click on "Add production period", you can enter the related information and save it. In case you need to split the production period into more intervals, you can perform the steps on the remaining time again.
Except where otherwise noted, content on this site is licensed under the Development License Agreement.